Overview
Bolt 6 Kit is a wireless video transmission system that supports up to 1080p60 10-bit 422 HDR video over 3G-SDI, or 4K30 over HDMI. It allows you to view the camera's image from a distance (up to 750ft) on a separate monitor.
It's compact nature makes your build smaller and compact. And this kit comes with multiple mounting options to keep things simple based on your build.
It is a great option to wirelessly connect to a larger Flanders monitor for the director/crew to see the image without crowding the on-camera monitor or LCD screen.
Table of Contents
- EDC Teradek Bolt 6 Wireless TX/RX Kit Component Guide
- Quick Start Guide
- Troubleshooting
- Compatible EDC Accessories
- Tips & Tricks
EDC Teradek Bolt 6 Wireless TX/RX Kit Component Guide
Quick Start Guide
First Steps
- Mounting Transmitter to Camera Rig
- There are several ways to mount the transmitter to your rig. The EDC supplies several mounts in this kit.
- The receiver has a 1/4-20" threaded hole to connect to each mount.
-
Articulating Mount - allows you tilt the transmitter. This mount requires a 3/8" threaded hole and 2 ARRI Pin holes to mount to your camera cage.
- Thread the 1/4-20" screw into the transmitter's threaded hole - located on the bottom.
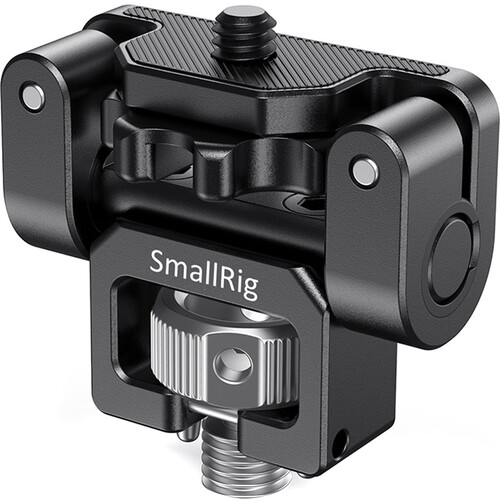
- Line up the bottom 3/8" screw and ARRI pins to your camera cage.
- Use the silver tie-down to secure the Articulating Mount to your camera cage.
-
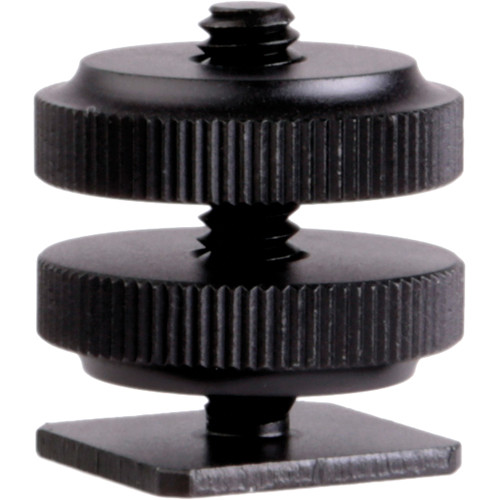
Hot Shoe Adapter - this mount allows you secure it to a camera's shoe mount.
- Screw the top 1/4-20" screw into the transmitter.
- Secure by turning the gear closest to the transmitter in towards the receiver.
- Loosen the gear closest to the adapters's foot so space is created between them.
- Slide the foot into the camera's shoe mount.
- Secure by tightening the gear towards the foot.

Hot Shoe Adapter Camera Shoe Mount
-
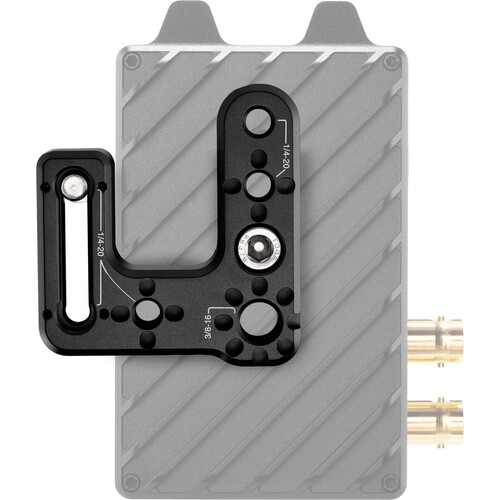
Offset Mounting Bracket - This mount allows you mount the transmitter the camera cage offset. This best used on the ARRI Alexa 35's Articulating Mounting Plate.
- Line up the bracket to the back of the transmitter to the 1/4"-20 thread.
- Using the one of provided offset screw, secure the bracket to the back of the transmitter.
- The other side of the bracket can be screwed into an accessory cage plate.
-
Stand Adapter - This mount allows you connect the transmitter OR receiver to a stand with a baby pin.
- Screw the threaded into the bottom 1/4-20" hole of the transmitter or receiver.
- Loosen the tie-down on the adapter and put on the baby pin.
- Tighten the adapter tie-down to secure
- Thread the 1/4-20" screw into the transmitter's threaded hole - located on the bottom.
-
Articulating Mount - allows you tilt the transmitter. This mount requires a 3/8" threaded hole and 2 ARRI Pin holes to mount to your camera cage.
- Mounting Receiver to Flanders Monitor
- Using a V-Mount battery with a V-Mount mount on both sides, and D-Tap Port, slide the V into the V-Mount battery plate on the back of the Flanders Monitor.
- Slide the back of the Receiver's V into the V-mount mount on the front of the v-mount battery plate.
- Using the D-Tap power cable from the Flanders kit, plug the D-Tap into the V-Mount battery and the pin side into back of the monitor.
- Antenna Orientation
- Depending how you mount the transmitter/reciever, you might need to adjust the antenna orientation so the antennas are pointing up.
- Use the joint to turn the antenna to the desired direction. Do not force it into any direction.
- Spin the antenna if needed get in the right position for turning.
- Recommended Angles
Powering & Connecting
Powering
- Powering the Transmitter
- Power the transmitter by using one of the provided 2-pin Lemo Cables ( 2-pin Lemo to AC (Wall power), 2-pin Lemo to D-Tap, & 2-pin Lemo to 2-pin Lemo)
- Line up the Red dot on the 2-Pin Lemo cable to the 2-Pin Lemo port on the side of the transmitter.
- Gently plug the 2-Pin lemo cable in until it clicks.
- Plug the other cable side into its respective supply (AC = Wall power, D-Tap = battery with D-Tap port, 2-Pin Lemo = 2-Pin Lemo port *only available on the ARRI Alexa 35*)
- Powering the Receiver
- You can use a 2-Pin Lemo cable OR a V-mount battery.
- 2-Pin Lemo
- Power the transmitter by using one of the provided 2-pin Lemo Cables ( 2-pin Lemo to AC (Wall power), 2-pin Lemo to D-Tap, & 2-pin Lemo to 2-pin Lemo)
- Line up the Red dot on the 2-Pin Lemo cable to the 2-Pin Lemo port on the side of the transmitter.
- Gently plug the 2-Pin lemo cable in until it clicks.
- Plug the other cable side into its respective supply (AC = Wall power, D-Tap = battery with D-Tap port, 2-Pin Lemo = 2-Pin Lemo port *only available on the ARRI Alexa 35*)
- V-Mount
- Slide the V-Mount battery on to the back of the Transmitter.
- Also see Mounting Receiver to Flanders Monitor in the previous section if using a Flanders Monitor.
- Slide the V-Mount battery on to the back of the Transmitter.
- 2-Pin Lemo
- You can use a 2-Pin Lemo cable OR a V-mount battery.
To turn on the transmitter & receiver, toggle their on/off switch on their respective sides.
Connecting
- Connecting the Transmitter
- Use an SDI or HDMI cable to connect the transmitter to the camera.
- Pick based on the available output ports on the camera.
- If SDI is available - it is recommended for use due to its twist & lock mechanism.
- HDMI
- Plug the HDMI into the Camera
- Plug the HDMI into the HDMI Port on the side of the transmitter
- SDI
- Plug, twist & lock the SDI into the Camera
- Plug, twist & lock the SDI into the SDI IN port on the side of the transmitter.
- Use an SDI or HDMI cable to connect the transmitter to the camera.
- Connecting the Receiver
- Use an SDI or HDMI cable to connect the transmitter to the monitor.
- Pick based on the available output ports on the monitor.
- If SDI is available - it is recommended for use due to its twist & lock mechanism.
- HDMI
- Plug the HDMI into the monitor.
- Plug the HDMI into the HDMI Port on the side of the receiver.
- SDI
- Plug, twist & lock the SDI into the SDI IN port on the monitor
- Plug, twist & lock the SDI into the SDI OUT port on the side of the receiver.
- Use an SDI or HDMI cable to connect the transmitter to the monitor.
Pairing
They should automatically be paired. But if you are having issues, you can try unpairing & pairing again.
- Unpairing
- Using the joysticks by the small screens on the transmitter & receiver, navigate to the Unpair menu.
- Select the transmitter/receiver you want to unpair and press the joystick IN.
- Using the joysticks by the small screens on the transmitter & receiver, navigate to the Unpair menu.
- Pairing
- Using the joysticks by the small screens on the transmitter & receiver, navigate to the Pair menu.
- Select Pair. The transmitter will start looking for a receiver to pair with.
- The screen will update once the pairing process is complete or unsuccessful.
- Using the joysticks by the small screens on the transmitter & receiver, navigate to the Pair menu.
Troubleshooting
Q: I am not getting any image on my monitor/ The monitor says "No Video."
A: If there are multiple output options for your camera, make sure that your camera setting is outputting the correct option based on the cable you have connected to the transmitter.
OR
Try unpairing & pairing the transmitter & receiver.
OR
The SDI or HDMI cables are not working. Please contact the EDC for further assistance.
Q: The monitor says "No Link."
A: Try unpairing & pairing the transmitter & receiver.
OR
Make sure they are close enough together and there is a clear line of sight between the two.
Compatible EDC Accessories
Access is dependent on class equipment allocations & availability
- Canon C70
- ARRI Alexa 35
- 5" & 7" Shinobi Monitors
- All Flanders Monitors
- V-Mount Batteries with a D-Tap Port
Tips & Tricks
- You can also connect your camera to a 7" Shinobi monitor and then output the image to the Transmitter via the SDI OUT or HDMI OUT port on the Shinobi monitor.
- Keep all unneeded components in the case. Do not mix them up in other cases.