Word.emerson.edu is a network of WordPress sites maintained by the Instructional Technology Group (ITG) and available to members of the Emerson community upon request.
Request a blog
Need a blog for curricular use? If you're a student, you likely already have a blog set up for you by your instructor. If you're an instructor, you can request a blog with the steps below.
- Go to support.emerson.edu.
- In the top right-hand corner, click Submit A Ticket and fill out the form. (You can request for yourself training at the same time, just mention it in the description!).
- In Subject - Enter Course Support - New Blog Request.
- In Description enter details about the request (including what course it is for, and whether you need one class blog, individual blogs for each student, or both).
Log into Word.Emerson
- Go to word.emerson.edu and log in with your Emerson username and password.
- You may either find yourself at a WordPress Dashboard screen or a custom landing page that lists out your sites.
WordPress Dashboard
- On the top navigation bar, click on My Sites [1] to see the sites you currently belong to and to select the site you would like to go to from the dropdown list.
- If you don't see the site you're looking for, submit a ticket for help by emailing itg@emerson.edu.
- The name of the site that you are currently editing appears next to the My Sites link in the black bar above [2].

Custom landing page
- The custom landing page won't have a black admin bar like the Dashboard.
- Choose the "Visit Dashboard" link for the site you're looking for from the list under "Your Sites."
Creating Posts
A WordPress blog is made up of a series of posts. Begin posting to your site by creating and publishing posts:
- Select the site you would like to post to from the My Sites drop-down menu.
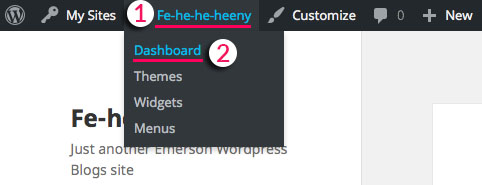
- If you are already on your site, you can easily get to the Dashboard by clicking the name of your site in the top navigation bar [1] and selecting it from the drop-down menu [2]:
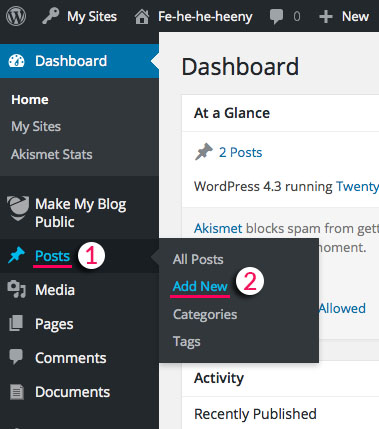
- Create a new post by clicking on the Posts tab [1] and choosing Add New [2] from the left-hand menu bar:
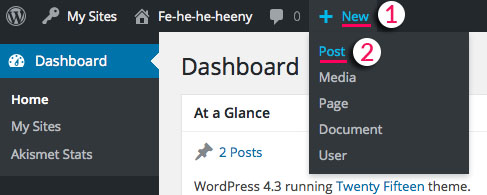
- Alternatively, you can create a new post by clicking on + New [1] from the top navigation bar, and selecting Post [2] from the dropdown menu:
Understanding Classic Editor and Block Editor
There are two editors available on Word.Emerson sites: Classic Editor and Block Editor. The Classic Editor is the older editor, a classic WYSIWYG (What You See Is What You Get) editor. The Block Editor is the newer, more powerful editor interface. It allows you to build posts and pages using blocks.
Important things to know about Classic Editor and Block Editor on Word.Emerson sites
- Site admins have the ability to set the default editor as Classic Editor or Block Editor. Site admins also have the ability to allow users of that site to switch between Classic Editor or Block Editor, or not. This setting is under Settings > Writing.
- For newly created sites, the default editor is Block Editor and by default users have the ability to switch between Block Editor and Classic Editor.
To select Classic Editor or Block Editor (when enabled)
-
On the Posts page, hover over the name of the post. Click Edit (block editor) or Edit (classic editor). The editor last used to edit the post will appear to the right of the blog post title.
- Selecting the post's title will open the post with the editor last used on the post (Block Editor or Classic Editor), even if a different content creator last edited the post. This is to ensure consistency in the post, so please bear this in mind for sites with multiple users who can create and edit content.
Quick Start Guide to writing a basic post with Block Editor
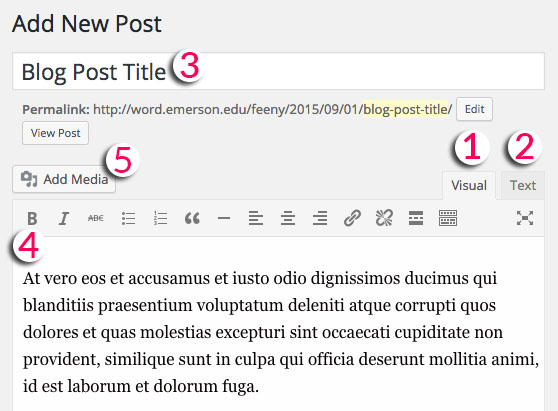
- Enter a title for your post [1]. Type the text for your post [2]. The block type is Paragraph by default. Edit settings for your post, including publication options, categories, and tags [3]. When you are ready to publish your post, click Publish [4].
- To add a block (including media) to a post, type a forward slash / in the body of the post to reveal a menu of poplar blocks. Click on the block type that you want to add.
- You can also add blocks by clicking on the plus sign + icon in the top left. This will expand a panel on the left side of the screen that shows different types of blocks.
Resources on using the Block Editor
- WordPress Block Editor: A detailed guide on the block editor
- Blocks List: A list of available blocks, what they do, and how to use them
Quick Start Guide to writing a basic post with Classic Editor
- Click on the Visual Editor to use a rich text editor tool [1]. If you are familiar with HTML code, you can utilize the Text editor [2].
- Enter a title for your post [3], add text [4], and/or also add media [5] to your post:
- When you are ready to publish your post, click Publish:
Categories
You can add categories to your posts to keep similar topics easily viewable to users. You can also create parent and children categories.
- Here's how to use categories to group posts by their author. For example, you can create a category called "Student Journals," and you can give it a child category for each of your students' names:
- When you're building a navigation menu, you can create a placeholder item such as "Student Journals" and add each category—each student's name—as a dropdown item:
- When your students write posts, ask them to check the box next to their name in the Categories panel on the editor's right-hand side. This assigns their post to their category:
- When the blog viewer clicks on a students' category in the menu, they'll be taken to a category page listing all posts in that student's category:
Here's a WordPress guide to using categories.
Here's a WordPress guide to creating menus (and see later in this guide for more info).
Creating Pages
Pages are used to present static information about yourself or your site. Creating individual pages in WordPress is similar to writing a post. Like posts, pages can be built with the Classic Editor or the Block Editor. The editing interface is the same as for creating blog posts.
- Click Add New in the Pages menu.
- Enter in a title for your page, text, and any media.
- When your page is ready, click Publish.
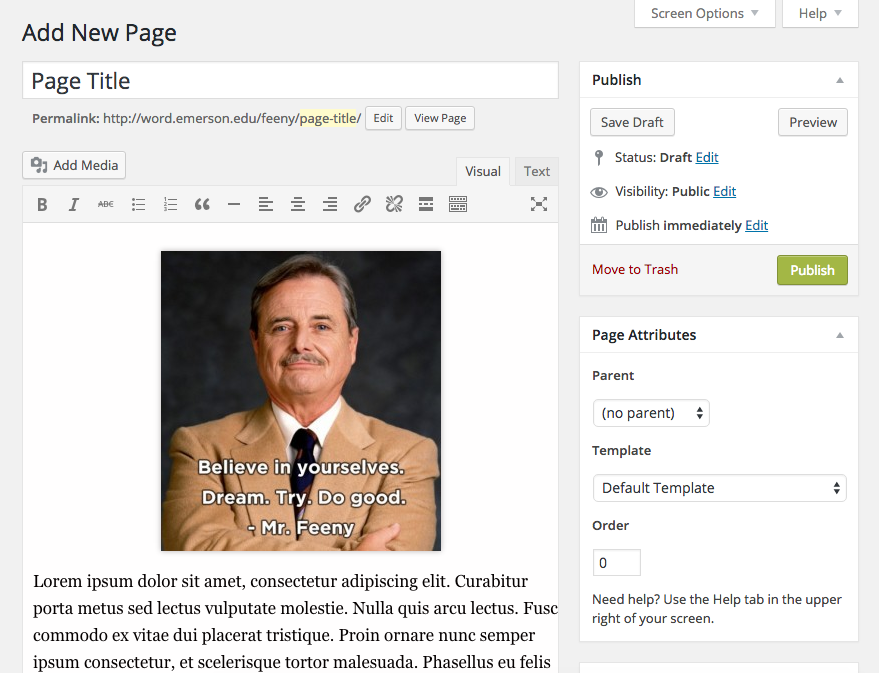
Example of a page created with block editor:
Example of a page created with Classic Editor:
Adding Media
You can upload and insert images and audio files of less than 4 MB in WordPress pages and posts. For embedding videos you own, we recommend using Panopto. Here's how to add non-video media:
Block Editor
- Find the post or page on which you'd like to add media, and click Edit (or add a new post or page). You can also upload media to the Media Library from the dashboard menu via Media.
-
Create an image block by either typing /image directly into the body of the page or post and clicking on Image in the menu that appears.
-
In the Image block, click Upload to upload an image from your device. If you already added the image to the Media Library, click Media Library.
Classic Editor
- Find the post or page on which you'd like to add media, and click Edit (or add a new post or page). You can also access the Media Library from the dashboard menu under Media.
- A new window will appear. Drag-and-drop your media into the uploader, or use the file browser to select it from your local files. You can also view and select items you've already uploaded by clicking the Media Library tab, then clicking the item of your choice. When it's selected, click the blue Insert button at the bottom right.
- The media will appear in the Visual tab of your editor. Optionally, you can add text and/or other media around it. When you're finished editing your post or page, click Publish (or Update).
- Here's what your media looks like on the published post:
See this WordPress guide to adding media for a more detailed description of your media-related options.
Need to adjust your image's dimensions or file size? Use this guide to optimizing images for WordPress.
Changing and Customizing Themes
Themes are visual and organizational wrappers for your blog. The theme you choose will not only determine what your blog looks like, but also how many widget areas it has, where the main menu appears, and more. To change your theme:
- In the lefthand menu of your blog's dashboard, hover over Appearance and click Themes.
- Hover over the theme you're interested in, then click Activate (if you're sure) or Live Preview. Changing themes preserves all your content, but may alter your active widgets and their locations.
- Note: Some themes were created to work best with the Block Editor. Some of these themes are Twenty Nineteen, Twenty Twenty, and Twenty Twenty-One.
- To fine-tune your theme, use the Customizer, also under Appearance. Read this WordPress guide to the customizer for more info.
- The guide above also contains information about using widgets, small additional functions that can be placed at various locations on your blog. Examples include a text box, a Twitter feed, or a search bar.
Creating Menus
A menu is a list of links—usually horizontal, but sometimes vertical—that users will use to navigate your blog. See this WordPress guide to creating menus for detailed instructions.
See also this video guide to creating different types of dropdown menus.